There are two ways to create a teaser video for your virtual tours:
Tour as a Service
You can get a teaser video built entirely for you as a part of your TaaS order. To do this, you will first need to create a new tour and upload your 360 photos. You can find details on how to do this in the article linked below:
Once you've uploaded and reviewed your 360 photos, please follow these steps:
1. Click the Build My Tour button at the top of your screen.

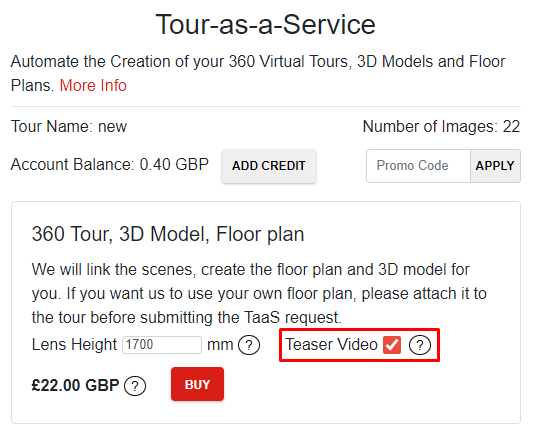
2. A new window will open. Add in your camera lens height and then select the Create Teaser Video checkbox.

3. Click the Buy button and you will be prompted to enter your payment information to complete your order.
When you have submitted your order successfully, you will receive an email confirmation. Our turnaround time for your order is less than 24 hours Monday to Friday. You will receive two subsequent emails once your order is completed: the first will contain a download link for your teaser video, the second will include a link to your published tour.
While your order is being processed your tour will be locked inside your account. Once your order is complete your tour will be unlocked and you can proceed to customise your completed tour.
DIY
You can also manually build your own teaser video directly from inside your tour editor. To do this, please follow these steps:
1. Login to your EyeSpy360 account.
2. Click on your chosen tour.
3. Double click on one of your donut shaped images or click the 360 button at the top of your screen to enter 360 View.
4. At the top of your screen, click the Video button. This will open a menu that allows you to choose to Create Teaser Video.

5. This will open the Teaser Video Creation Studio. Here you have multiple options in order to create your teaser video. The first section allows you to determine which 360 photos from your Library you wish to have included in your Teaser Video.
To add a 360 photo, double click the image in the Library column to transfer it to your Teaser Video column. Alternatively, use the Add all switcher to automatically add all of your 360 photos to the Teaser Video column.

6. The descending order of your images in the Teaser Video column corresponds to the chronological order of your 360 photos in your teaser video. You can drag and drop your images inside the Teaser Video column to reorder the sequence of your 360 photos.

7. Once you have determined the images you wish to include in your teaser video and the sequence in which they will appear, you can move to the second section of the Teaser Video Creation Studio: Image Preview.
Click on one of your 360 photos inside the Teaser Video column to view a preview in the Preview column. Here you can adjust the scope of each scene inside your video. You can drag the 360 image from left to right to adjust the desired focus of each space. You can also drag the white squares in the corners of the image to increase or decrease the field of view captured inside each scene of your teaser video.

8. Repeat this process for each of your 360 photos.
9. Above the Preview column is a switcher to Include Contact Information. When switched to Yes, this will automatically use the contact information included in your account profile if a branding profile hasn't been applied to your tour.
If you have applied a branding profile, this will then instead use the details provided inside this profile for your teaser video.

10. When you are ready to create your teaser video click the Create and Play button in the bottom right hand corner of the Teaser Video Creation Studio.

This will then return you to 360 View inside your tour editor and show you a preview of your teaser video as it exists inside your virtual tour.
11. To export your teaser video from your tour, you will need to republish. To do this, double click on the donut shaped image you wish your tour to start on. This will open 360 View.
12. Position your screen in your desired starting position and then click the red Publish button in the top right of your screen. This will republish your tour and update it with your changes.
13. Once successfully republished, the Publish window will appear. Under the Share Video heading, click the Export Video button to begin the export process for your teaser video.

14. Once the export begins, a confirmation window will open to let you know your video is now exporting. Once your export is completed you will receive an email with a download link for your video.
Alternatively, you can keep the publish window open and when your export is complete you can download your video here as well.
Was this article helpful?
That’s Great!
Thank you for your feedback
Sorry! We couldn't be helpful
Thank you for your feedback
Feedback sent
We appreciate your effort and will try to fix the article