Our floor names for our tours are standardised as different parts of the world use different floor numbering systems. However you are certainly able to customise and rename your floors at any time. To do this, please follow these steps:
Please note, the EyeSpyPLAN function is very sensitive. We recommend against making any changes here to your 3D model and 2D floor plan outside the steps detailed below as this may skewer or delete parts of your completed order.
1. Open your tour in the tour editor.
2. Enter 360 View.
3. Click on the EyeSpyPLAN button at the top of the screen.
2. Enter 360 View.
3. Click on the EyeSpyPLAN button at the top of the screen.

4. The EyeSpyPLAN window will open in the bottom right hand corner of your screen. There is a field named Floor which will have your current floor name displayed. To the right of this is an Edit icon. Click on the Edit icon.

5. A new window will open. In the right hand column you will be able to select each floor of your property. When a floor is selected you will see a field called Name beneath it. Here you will be able to type and rename your floors to whatever you wish. Click the Save button to save your new floor name.
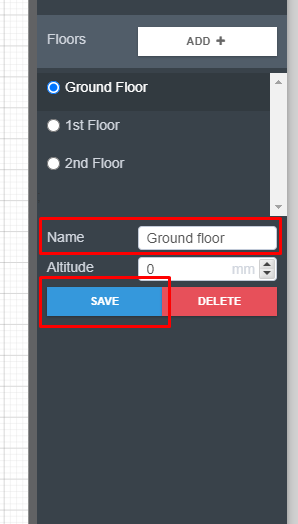
6. Rename all of your floors however you desire.
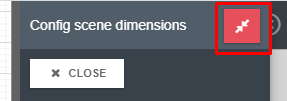
7. Once completed, click the red Close icon in the top right hand corner of this window.
8. Click the EyeSpyPLAN button at the top of the screen to exit EyeSpyPLAN.
9. Click the red Publish button to republish your tour and save your changes.
Was this article helpful?
That’s Great!
Thank you for your feedback
Sorry! We couldn't be helpful
Thank you for your feedback
Feedback sent
We appreciate your effort and will try to fix the article